The BaseLinker Pick &Pack Assistant module supports the process of collecting and packing orders. Its main purpose is to reduce the number of mistakes and speed up the whole process by using automatic actions.
Similar solutions are available in WMS (Warehouse Management System). These types of systems – used by the biggest market players – allow for significant optimization of logistics costs and shortening the order processing time. However such systems are expensive in implementation and maintenance. We want to enable small and medium-sized enterprises to use similar system solutions, but without having to invest a lot of money upfront.
The BaseLinker Pick &Pack Assistant, in combination with automatic actions, will allow significant optimization of the whole process.
Packing products
The BaseLinker Pick &Pack Assistant module supports packaging process. Individual activities can be performed manually, but the module works best with barcode scanner.
The module allows you:
- to control which product are packed. The system allows you to monitor which products from individual orders have already been collected and packed. Correctly packed orders will be marked in the system in green. On the other hand, a mistakenly packed order will be highlighted in red and the system will generate a beep when scanning.
- to save packing history. The exact packing logs are available after packing from the order card. The system allows you to check who, when and how long has packed a particular order.
- take a picture of your completed orders. The photo can be used for archival purposes, as evidence in case of a dispute with a client or courier, or as an element of creative communication with the client – sending it by e-mail or placing it on the Order Information Page.
- to display all orders on the packing assistant screen. The order details are large and clear so that the packer knows exactly what to pack. Orders can be selected manually from the panel or by scanning the Order Card.
- to adjust the information displayed on the Pick&Pack Assistant screen to your individual needs. There is a possibility of a separate configuration of the information displayed on the screen designed for the person collecting and packing the order (if these roles are performed by different people).
- to create new automatic actions executed after collecting or packing an order. After scanning the last product in the order and marking the order as packed, the system can e.g. print the invoice and label, send an e-mail to the customer and change the order status.
Module appearance
How to turn on the Pick&Pack Assistant module?
You can turn on the Pick &Pack Assistant in three ways:
When packing multiple orders at the same time, it is most convenient to use the “Packing” button available in Order Manager → Orders.
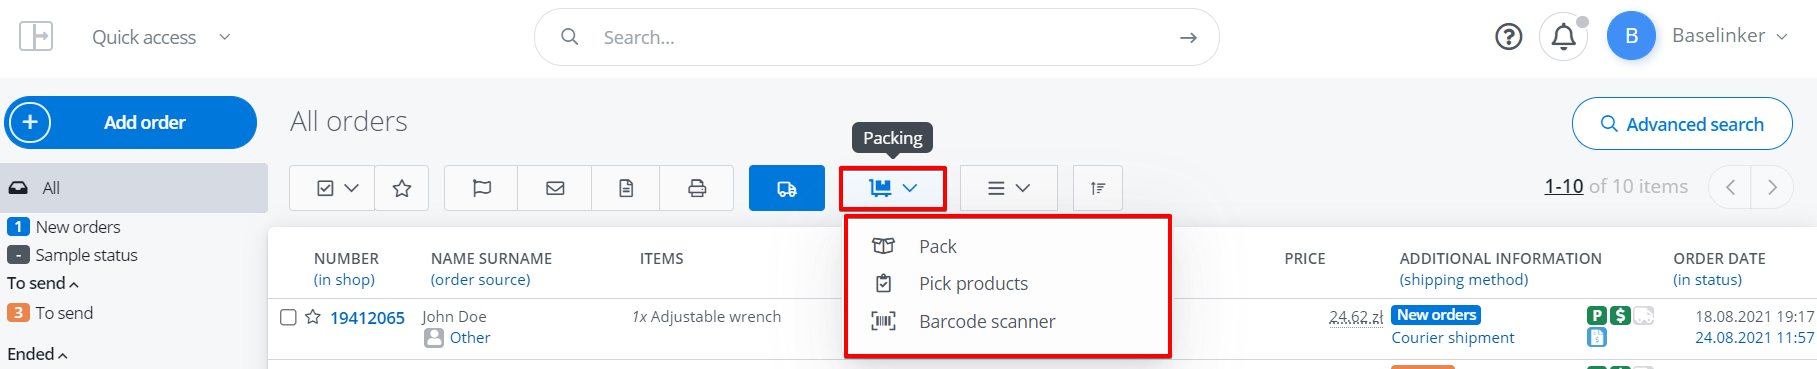
There are three items here:
- Pick products – button moves to the Pick &Pack Assistant screen, which is designed for the person who only collects products to order. This screen was created mainly for mobile devices.
- Pack – the button takes you to the Pick &Pack Assistant screen, which is designed for the person who is only packing products, or at the same time collecting and packing orders – if these roles are not separated in the company.
- Barcode scanner – used to configure barcodes.
The first two screens will be described later in this publication.
The packing assistant is also available from a order card. The table “Order information” contains three buttons: Pick products, pack and take a picture.

In addition, it is possible to call up selected functions and custom events using shortcuts, which can be set in Order Manager → Settings → Keyboard shortcuts.
How do you select orders to be packed?
There are two ways to do it:
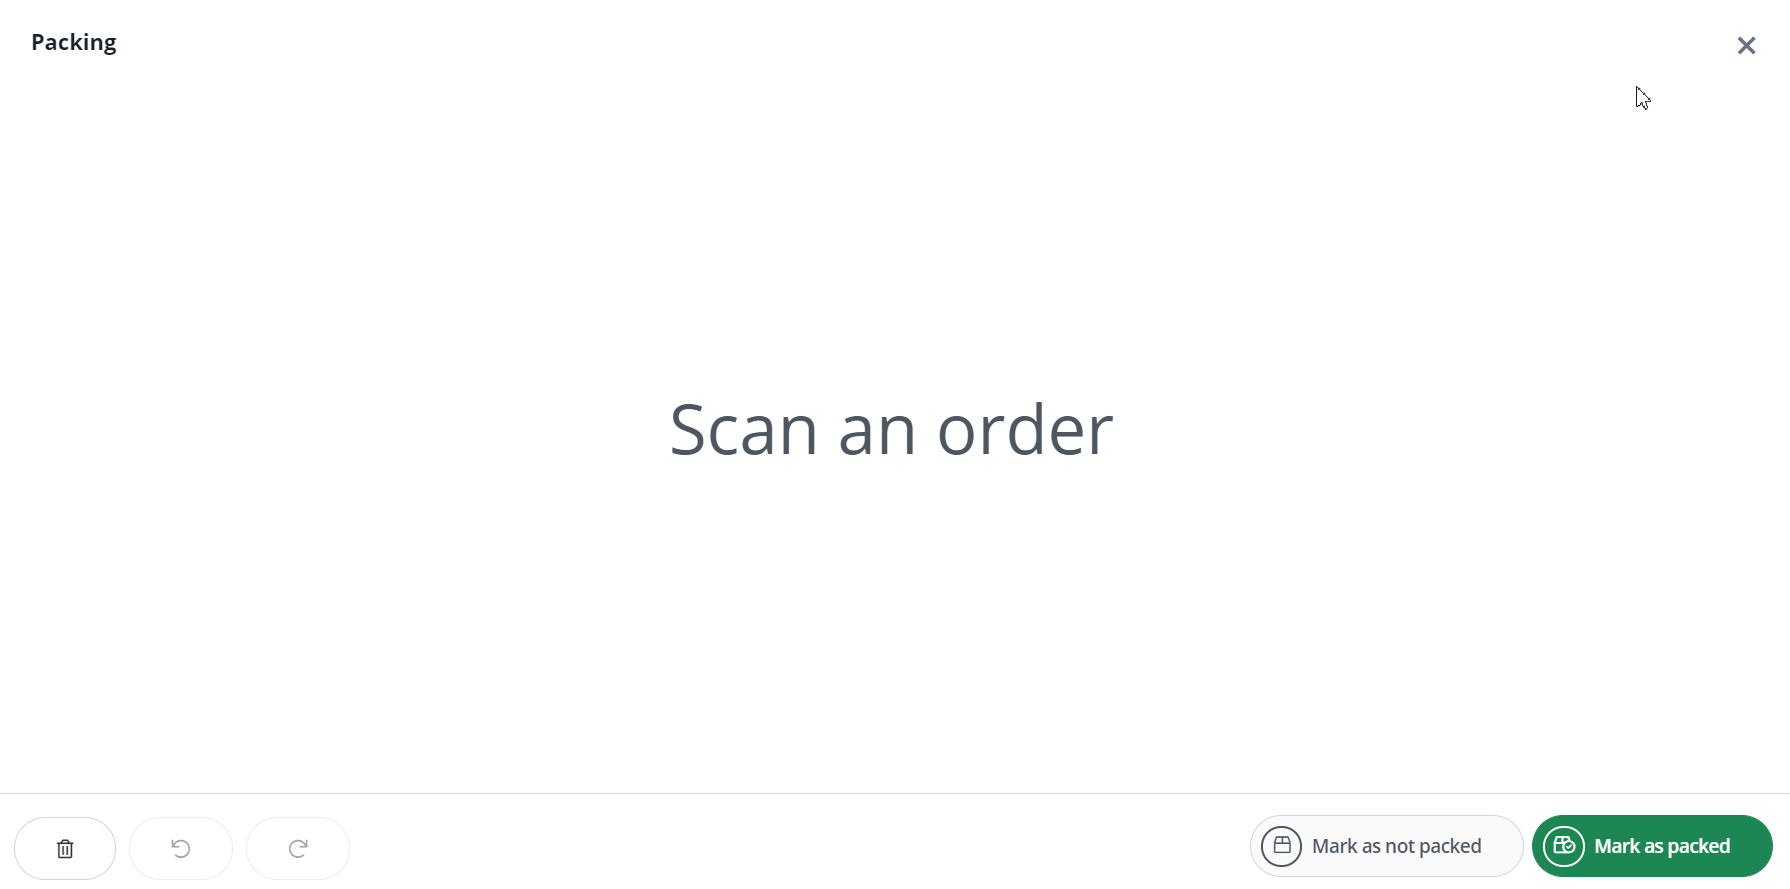
1. You can use a scanner. When you turn on the Packaging Assistant module, the system will ask you to scan the order. You can place such barcode on documents like order’s list, order card, invoice or label.
2. Marking orders to be packed by yourself in Order Manager → Orders (to facilitate this task, you can filter the orders based on the appropriate status, e.g. “To pack”) and then turn on the Pick &Pack Assistant module.
What kind of information is displayed on the Pick&Pack Assistant screen?
The Pick &Pack Assistant screen contains information about the orders to be packed.
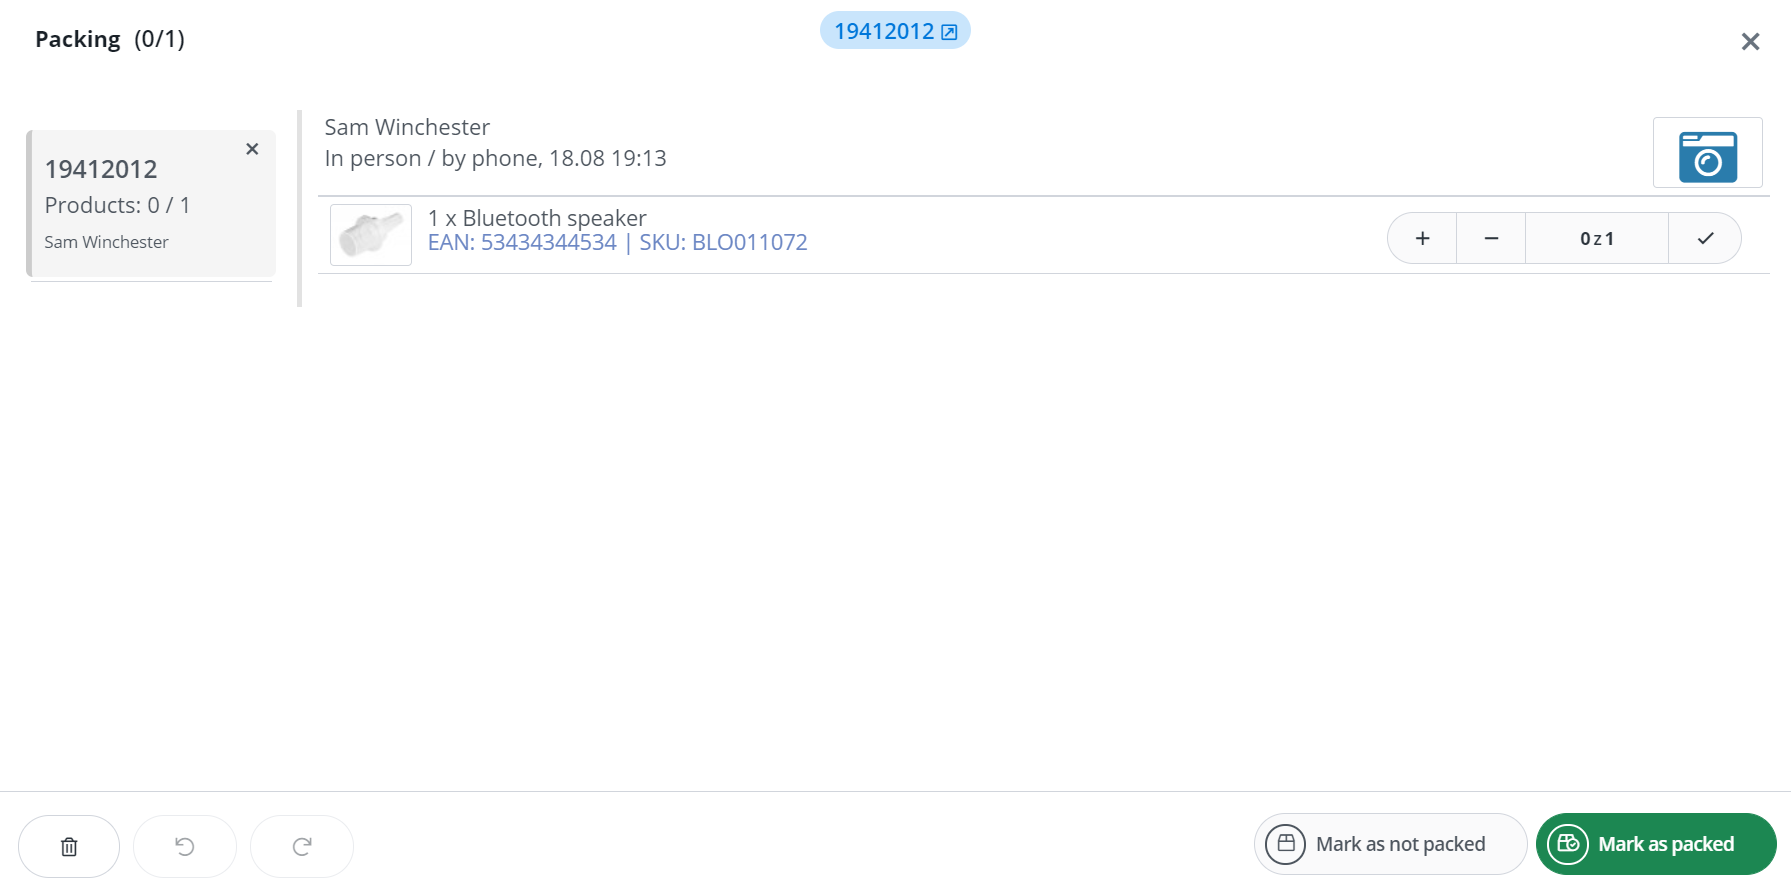
On the screen you can find following areas:
- Order tab – the list of orders selected to pack is visible on the left. Here each scanned order is added. Already packed orders can be hidden using the “Hide packed orders” button. In mobile version this tab is moved to the top of the screen.
- Order details – the top of the screen contains information about the selected order. The customer’s name and surname, as well as the date and origin of the order, are displayed here. Additionally, depending on the configuration, this place may contain such information as: buyer’s comment, seller’s comments, customer(login), order value, shipping method, sales document.
- Photo – the button in the top right of the screen allows you to take a photo. After the order has been photographed, the camera icon replaces the proper order photo. You can find more information in the section entitled “Documentation of packaging”.
- Products data – in the central part of the screen a list of products to be packed for the selected order is displayed, together with additional information: thumbnail photo, product EAN code, product SKU code and its attributes. Each record has “+” and “-” buttons allowing you to manipulate the number of products added to the order.
- The buttons at the bottom of the screen
- Hide orders with collected products – useful if the list of orders to be packed is long and you would like to see only unpacked orders
- Undo the operation / repeat
- Mark as not collected – means all products in the order as unpackaged
- Mark as collected – means all products in the order as packed
Visual and audio information
Depending on the packaging stage, each item visible in the order bookmark can be displayed in one of the following colours: white, yellow, red or green.

An order for which no product has yet been packed is marked in white. Orders during the packaging process are displayed in yellow and those completed are displayed in green.
If by chance more products are packed than they should be, the system indicates this in red. In addition to the visual information, the system also signals the packaging error with a beep.
How do you mark an order as packed?
The whole order will be marked as packed when each product in this order is packed. This can be done:
- Marking each product in the order as packed. This can be done:
- Using a scanner – scanning the EAN/SKU code of the product, so the system will mark one piece of this product in an open order as packed
- Manual – by selecting the “+” button on the packing assistant’s screen for each product from the order, the appropriate number of times
- Use the “Mark as packed” button and change the status of all products in the order at the same time.
As a result, the entire order is marked green and the system can take a picture of the completed order – if such an option has been previously configured.
Collection Assistant
“Collection” screen differs from the “Packaging” screen only by the absence of the “Photo” button. Other differences can only result from the user’s preferred settings available in Order Manager → Settings → Packing. You can discuss this possibility in the configuration section.
The collector can use the Collection Assistant by running it on his or her phone or tablet. Mobile devices should be additionally equipped with bluetooth code scanners. The compact scanner can be permanently attached to the phone casing, making it the equivalent of a data collector. A tablet, on the other hand, can be attached to the trolley of the collector and connected to a portable Bluetooth scanner (e.g. worn on a finger).
Recommended methods of product collection:
- Picking using the picking assistant (if an collector picks products for packer)
- Picking based on order list printout with barcodes.
- Picking based on the product list printout – allows you to collect products for multiple orders simultaneously, the so-called batch picking. Recommended if multiple orders often repeat the same products.
Scanning
In order to take full advantage of the Pick &Pack Assistant module, you should equip yourself with any barcode scanner.
First connect the scanner to the device on which the BaseLinker is open – it can be a computer, tablet or mobile phone.
The packer receives a document with a barcode. Scanning an order or a tracking number adds the relevant order to the collection/packing window.
Order barcodes can be found on the following documents among others:
- order card printout
- label printout (scanned number of the assignment)
- printout of the shipping list (with order codes)
- invoice printout (with template containing order codes)
After scanning the order, the packer starts scanning individual products for the order. Scanning the EAN/SKU code of the product means one piece of this product in an open order as packed.
Automatic actions
Once the collection/packing of products is complete, automatic actions can be called up. This is done by events from the Pick &Pack Assistant group:
- “Collected order products”
- “Order packed”
For a currently collected/packaged order, you can call up your own action events via shortcuts and scan the barcodes assigned to these events.
Automatic actions in conjunction with the Pick &Pack Assistant offer great opportunities to improve the entire packaging process.
Below you can see the structure of a sample setting of the automatic action using the “Packed Order” event
| Action | |
| An order was packed Condition: Customer wants an invoice |
1. Print the document 2) Issue an invoice 3 Print document – Invoice [PDF] 4. Send an e-mail Change status – For shipping |
In Order Manager → Automatic actions to one event, under certain conditions, you can assign a number of actions.

Configuration
The interface of the Pick &Pack Assistant can be modified according to your needs in Order Manager → Settings → Packaging.
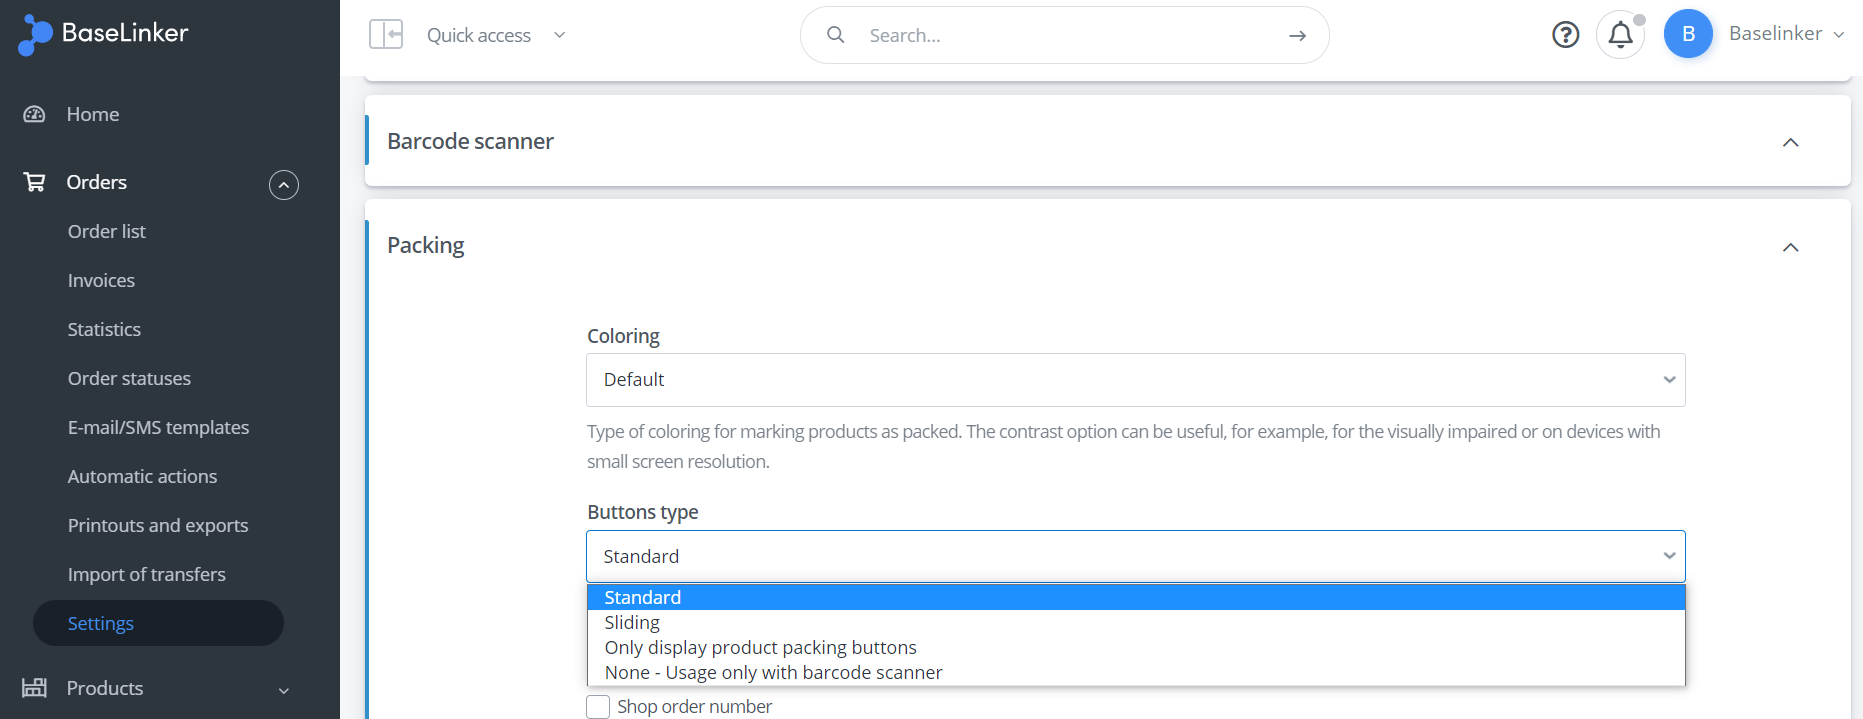
The following parameters can be configured:
- Colour scheme – Colour scheme for marking products as packaged. The contrast option can be useful e.g. on devices with low screen resolution.
- Button types – Kind of buttons in the packing assistant. The selection of sliding button options reduces the risk of accidental pressing of such a button.
- Modifications to the “Collection” screen
- Data of orders – Order details that will be displayed when collecting products.
- Product details – Product details that will be displayed when collecting products.
- Sorting products – Way of sorting products when collecting order products.
- Packaging screen modifications
- Data of orders – Order details that will be displayed during packing.
- Product details – Product details that will be displayed during packaging.
- Sorting of products – Way of sorting products while packing products of the order.
- Photo – countdown – Number of seconds from packing the order to taking a picture of its products.
- Products collected / packed by default – Product names that will be automatically marked as collected / packed in the packing assistant. An option useful for handling order items that do not have EANs assigned, such as discounts. It is possible to enter multiple names after the decimal point. To search for a fragment that is only a part of the name, use the ‘*’ sign at the beginning or end of the search phrase, e.g. type ‘Green*’ to search for ‘Green’ and ‘Green’.
If the roles of the collector and packer are separated, the user can set up separate configurations for the Collection Assistant and Packing Assistant.
For example, the “Collection” screen may include an additional comments box for product parameters, and the products themselves may be sorted by SKU, making it easier for the collector to find the product if the SKU contains location information.
This information may be hidden from the packager. Instead, the “Packaging” screen may contain an additional field “Order Value”. – This will allow you to check if the order has been properly packed and the products themselves can be sorted by default – according to the order of products in the order.
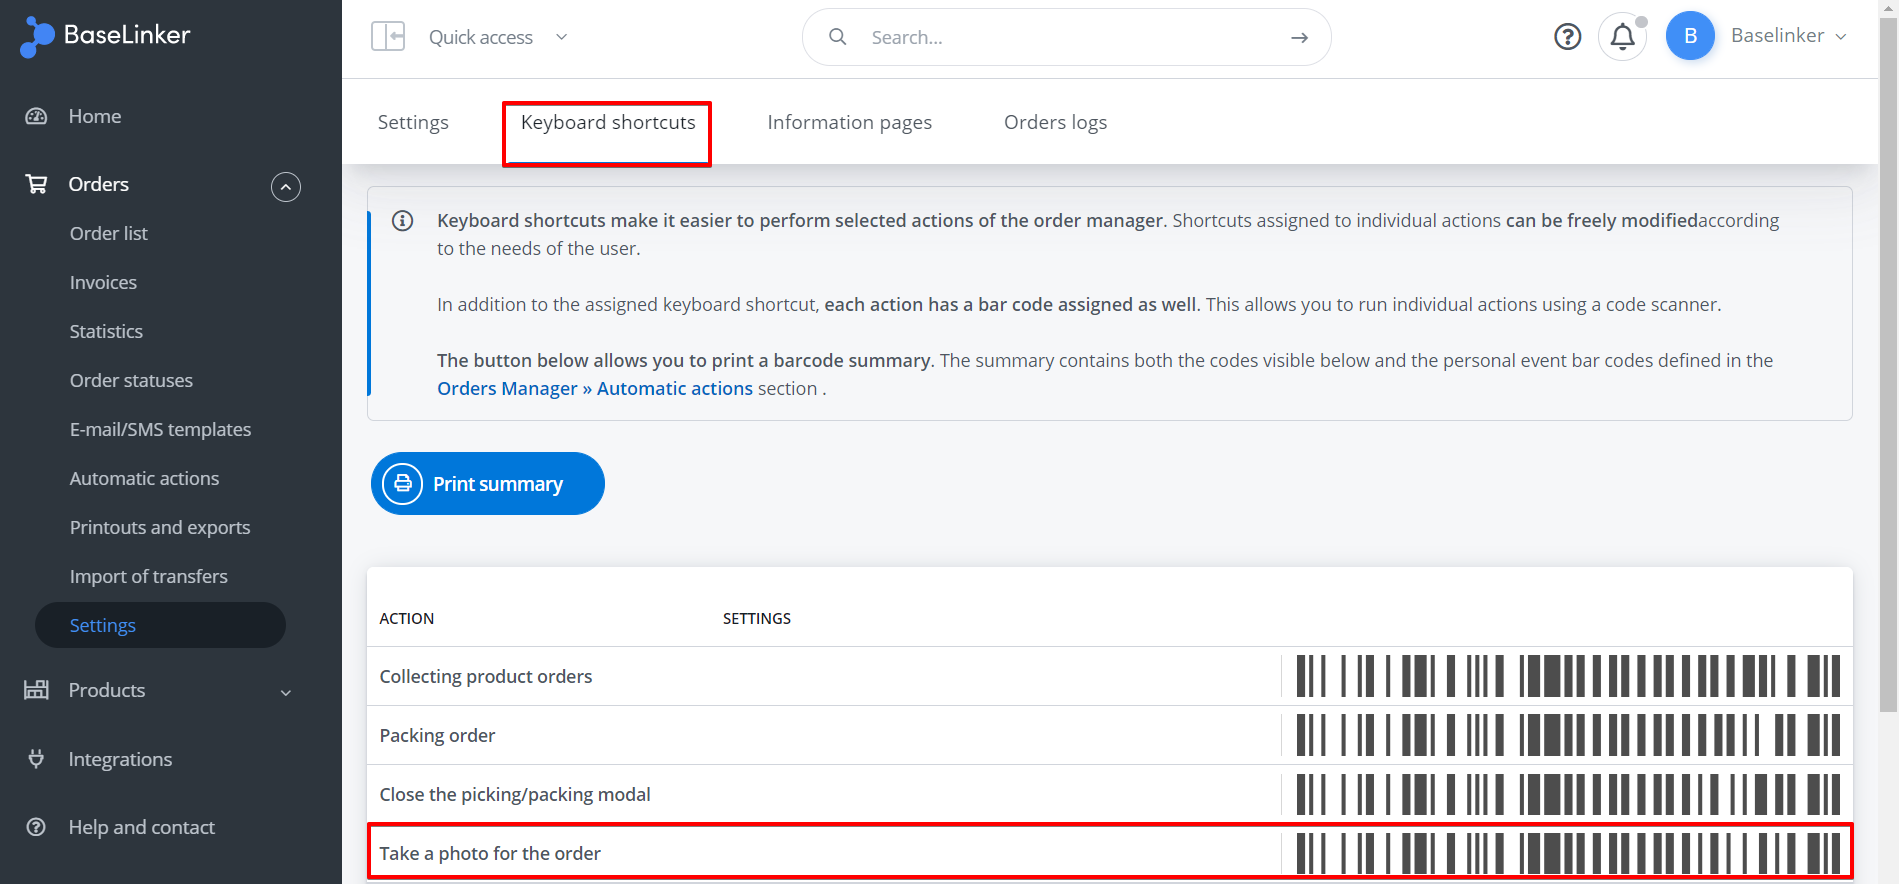
Keyboard shortcuts
The barcodes in the packaging module can be used to handle the whole process of collecting and packing an order or only the selected item.
To do this, print out the available shortcuts together with the barcodes in Order Manager → Settings → Keyboard shortcuts. After scanning the selected code, the corresponding system function or user-defined automatic action will be performed.
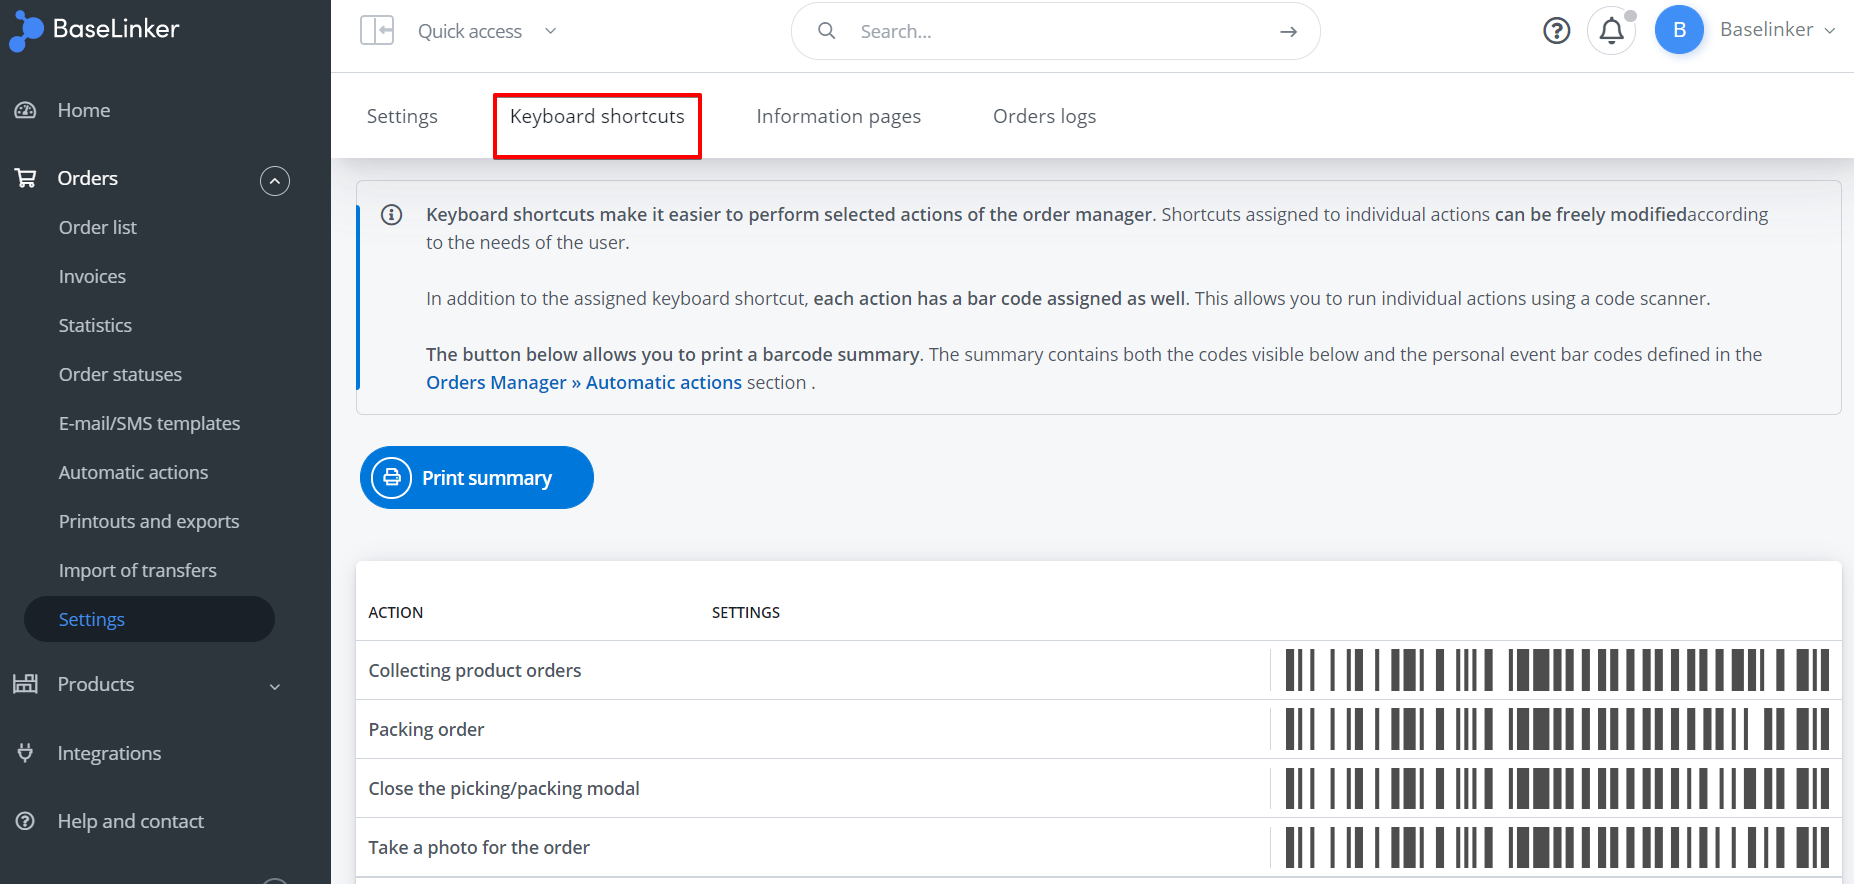
Shortcuts for built-in system functions dedicated to the Packaging module are:
- Pick up order products
- Packing an order
- Close the collection / packing window
- Please take a picture for the order
Previous/next order shortcuts also work in the packaging module (when multiple orders are added to it).
Packing documentation
The BaseLinker packaging assistant gives the user the opportunity to take a picture of the completed order. This is an unusual feature that can be an interesting complement to the process of packing orders.
To do this, simply connect any webcam or other USB camera to your computer. The camera can be mounted above the packing station so that it faces down onto the entire table. It can take pictures of the verified and lined goods on the table, or take a picture of an open shipment – before the carton is sealed.
Why is it worth taking a picture of the order?
Having a photo order can bring a number of benefits:
- for the seller
- is a proof of sending all the goods in case of a dispute with the customer
- is a proof of no damage in case of a dispute with the courier
- allows to verify a possible employee error giving a preview of what was packed and sent
- for the customer
- provides a quick response to potential packaging errors, e.g. wrong color of the ordered product
- can be an element of creative communication – such a picture can intrigue the client and put him in a happy mood of waiting for the ordered package 🙂
How do you turn on the photo shoot function?
When you first try to take a picture from the Packaging Assistant screen, after selecting the camera icon, the system will ask for permission to turn on the camera. The selection will be saved for the workstation.
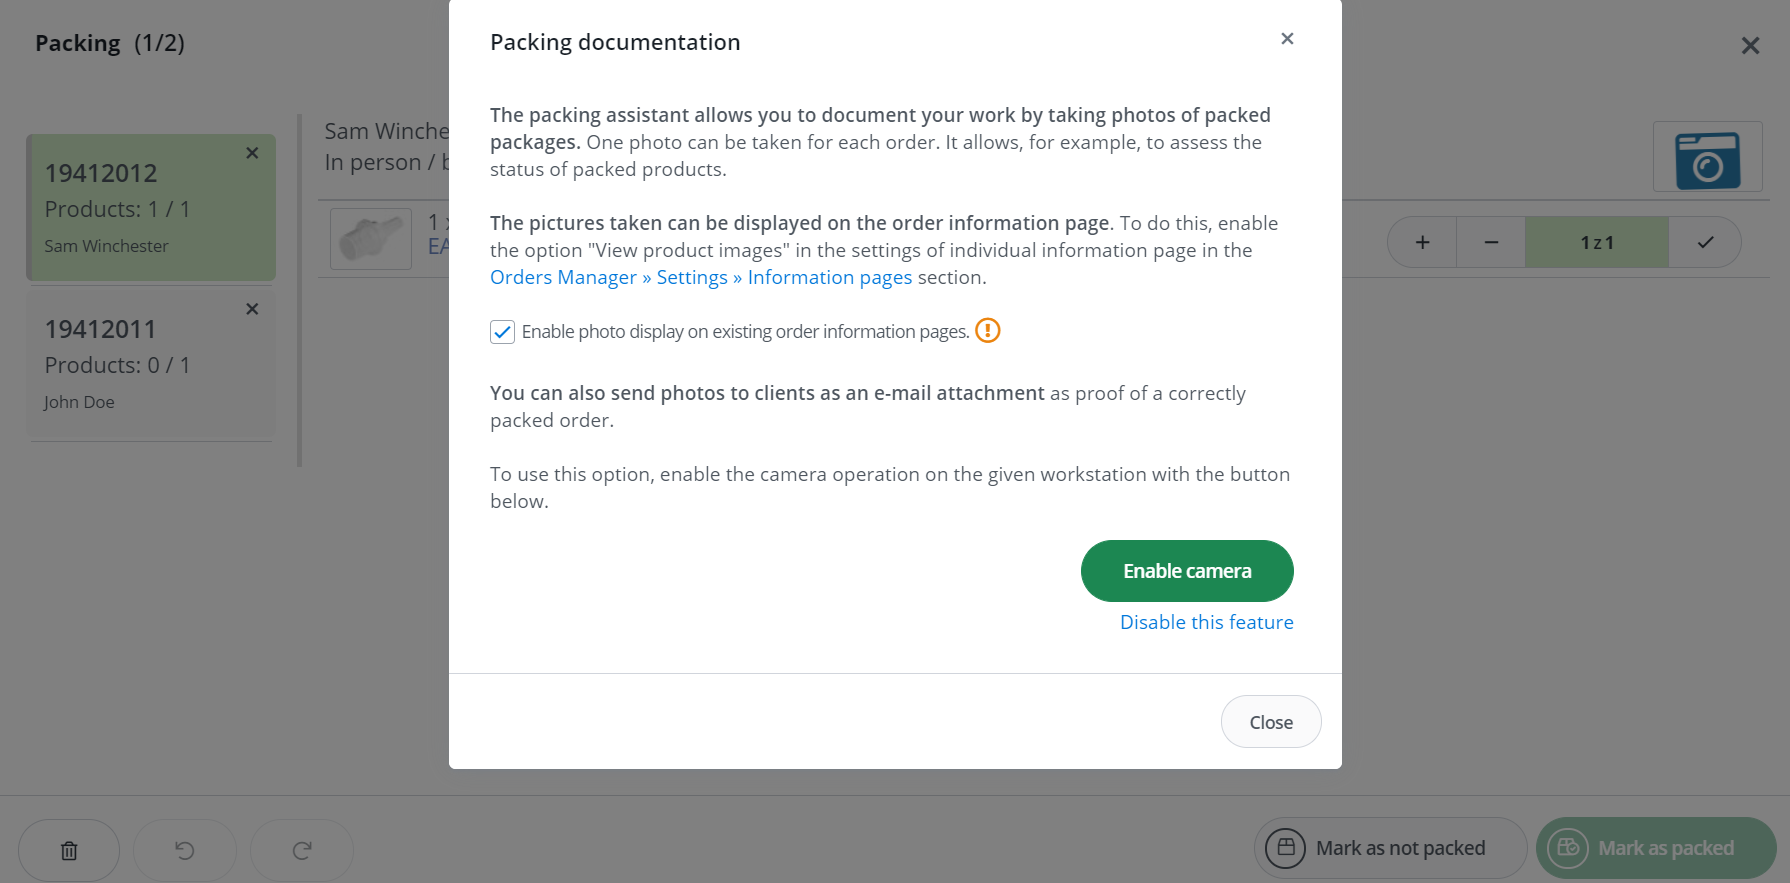
How do you take a picture?
By default, the picture is taken automatically, five seconds after the last product in a given order is packed. The time from marking the order as packed to take a photo can be set in Order Manager → Settings → Packaging → Photo field – Countdown. User can also manually select the camera icon on the “Packaging” screen.
In addition, a photo of the order can be obtained:
- using the button on the order card (table “Order information”)
- using the shortcuts defined in Order Manager → Settings → Keyboard shortcuts
Where can you see the picture?
Photos can be stored for archival purposes or made available to the customer.
- The picture taken is shown on the order card under “Additional information”.
- Can also be seen on the order information page.
- Pictures can also be sent to the customer
- in email template as attachment
- in the form of a link – using the tag [link_photo_product]